From amateur to professional: Business email address

This series of blog posts endeavours to give tips to the freelance publishing world on quick, simple ways to give your online presence that professional edge, to make you really stand out from the crowd and be remembered by your contacts and potential clients.
This part is about how the majority of us communicate with our clients: email, and how as freelancers we can give our online presence a professional boost by obtaining a branded business email address.
Getting a business email address
One of the best ways to boost your online presence is to stop giving people or advertising your ‘free’ email address. Nothing says amateur like an email address ending in yahoo.com, hotmail.com or heaven forbid; aol.com. When I see an email address like this myself, a part of me cant help but think “this person isn’t a professional”.
Sorry.

via theoatmeal.com – http://theoatmeal.com/comics/email_address
Business email addresses are ones that finish with a custom domain, eg:
yourname@companyname.com
No matter how hard you try to avoid it, you’ll probably end up having more than one email address eventually. You might create additional ones to help keep business separated from personal matters, to sign up to newsletters, or someone may create it for you as part of a marketing or online branding plan.
You may hesitate, thinking it would be cumbersome – having to sign into a bunch of different online mail apps (not to mention trying to remember all of those passwords). And of course, you like using yahoo, hotmail, gmail, or whatever free email account you’ve been using for the last ten years. It’s familiar and you know how to get around and get things done (though, don’t get me started on how hotmail’s evolved over the last few years into outlook.com…).
Getting a branded business email address doesn’t mean you have to get rid of your old email, or log into a heap of different places. It doesn’t even mean that you need to use a different process or program to read your emails. You can work exactly the same way you’re already working with your email account. All that will change is that you’ll give a more professional-sounding email address to clients or networking contacts.
I have, at time of writing, a total of fourteen email addresses (and that doesn’t include ones I have forwarding to me on behalf of clients – they’re all personal or related to my own business), and I have ALL emails sent to any of these addresses forwarding to the one email account – my main gmail account. I go to this one account to access any or all of my emails, regardless of which of the fourteen has been used to contact me.
With so many email addresses, I’ve become kind of OCD about using gmail’s Filter settings, too, which lets you set up rules of what should happen to an email when it comes in, based on who it’s from, or who it’s to, or certain words in the subject line. It’s invaluable; I can easily glance at my inbox and see, thanks to these colourful filter tags, whether an email’s come from my mum or from the contact form on my website.
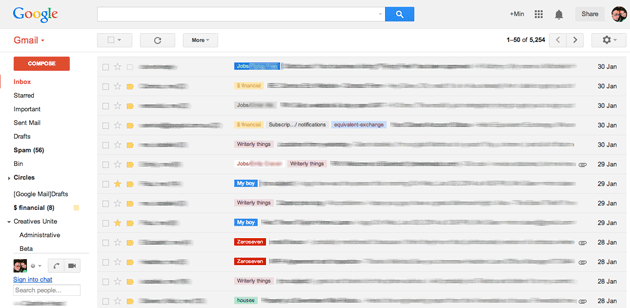
I live by gmail’s filters.
How do you get a branded business email address?
Step 1: buy your domain
You’ll need to own a domain before you can get the @yourcompany.com portion of your new email address. If you already have a business website, this step is already complete. If you don’t, head to a domain registrar, and register your business or brand name. VentraIP can help you here.
A custom domain will cost you somewhere between $15 and $20 a year, with prices often a little higher depending on the popularity of the domain. Most domains can be bought for a single year, but if you want a .com.au address, you’ll have to buy it for two years, and also quote your ABN during the signup process.
When you sign up your domain registrar will send you a couple of emails – one of which has your account login details, that lets you manage your domain. Keep hold of this email, because you’ll need to log into your domain account in step 3.
Step 2: get some hosting
Securing your domain with a registrar means that nobody else will be able to use your business name for their website or email address; it’s like simply purchasing the rights to exclusively use the address.
For an email address to function, email messages need both storage space and a server to send and receive through. This is where website hosting comes in. If you already have a business website, this step is already complete.
If you don’t, secure hosting with one of the many online website hosting providers, ensuring that in their features they list creation of email addresses.
I love VentraIP for this portion too – they are based in Sydney, have very fast servers, and their technical support team are super quick and really know what they’re talking about – they won’t give you the runaround, like so many other hosting companies will whenever you have a question.
Their website hosting starts at under $10 a month and you can signup online. I use them for a lot of my websites and I generally pay annually. During signup, make sure that you specify your domain name purchased in step 1.
Once your hosting has been processed and activated, you will receive an important welcome email that contains information like cPanel login details and nameserver addresses (both of which we’ll use later). Keep hold of this email – you’ll need to send it, or a portion of it, to anyone who is doing website work for you in the future.
Note: once you have a domain and hosting, you can not only have your own business email address, but your own website. If you’re interested in getting a website organised for your freelancing business, feel free to contact me for a quote. Note also that a website developer will often include the signup and setup of both domain and initial website hosting costs in a business website package, if you are worried that it’s too technical a process for you to complete on your own.
Step 3: nameservers
Now you have your domain secured and website hosting confirmed, you need to get the two services to talk to each other. This is done from your domain registrar account. If you’ve used VentraIP for both, chances are they’re already talking to each other. If not –
- Open the “Welcome” email sent to you by your hosting company of choice – locate the nameserver references.
- Log into your domain registrar of choice, and locate the DNS modification area. It differs from registrar to registrar.
- Update the name servers. In about 48hrs, the DNS record will propagate worldwide, and you’ll be set.
Step 4: create your email address
The welcome email from your website hosts will contain a link a cPanel; short for “Control panel”, and it’s where you can manage everything from setting up emails to creating databases for a website. Log into your cPanel, and look around for the email address option.
- After you’ve logged in to your cPanel, look for email management or email accounts.
- Look for something similar to “Create email account”.
- Enter a username for the email address. This is the leading portion of your email address; the @yourdomain.com portion will be added automatically. Enter a password or click the “Random” button to have one allocated to you – you won’t need to remember it if you are forwarding your business email address to your gmail, hotmail, or yahoo account anyway. Keep the password in a secure place if you’re planning on using the business email address without forwarding it to another account.
- Set the quota to whatever you like; I usually set it to 0, for unlimited.
- Select “Create”.
On successful account creation, a page will return displaying your new email address, your password, and your mail servers.
Keep this info somewhere secure if you plan on using your business email address without forwarding it; don’t worry about it if you’re forwarding it to another email account.
Step 5: forward your new email address
Now your email address has been set up, you need to tell your website hosting server that any mail incoming to this address needs to be sent automatically to the email address of your choosing – your gmail, hotmail, whatever. Look around your cPanel for Email forwarder settings. From the cPanel:
- Look for an entry called “Forwarders”, usually under E-Mail Management.
- “Create new Forwarder” or similar (wording may vary).
- Enter the username portion of the email address you created in step 4, and the entire email address you want to forward to, then select Create:
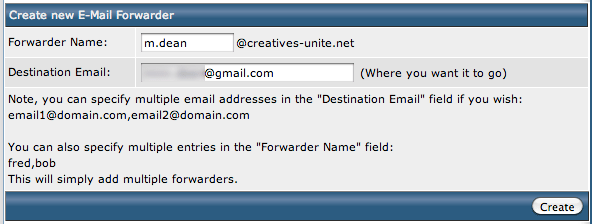
On successful forwarder creation, a page will display confirming that your business email address is being forwarded to your desired destination email address.
Step 6: test
The final step when setting up an email forwarder is to test that the forwarder is working. This can be done quickly and easily by sending yourself an email – to your new business email address – and waiting a moment to confirm that it’s arrived in your gmail, hotmail, or wherever you’ve instructed the email forwarder to forward to. Initially, particularly straight after setting the forwarder up, it may take a minute or two to arrive – but once you’ve confirmed it’s sending, you can log out of your domain registrar account, website hosting account, and just continue using your email address as normal.
It may look like a bit of work – but once your business email and forwarders are set up, you’ll be able to give clients and colleagues an email address that represents you and your brand, and sets you apart from the hundreds of other more amateur freelancers, who aren’t serious enough about their business to get a branded email address (that’s the way they’ll be perceived, anyway).You will appear more professional and technically savvy, which can only work in your favour in these competitive industries.
If you’re stuck with the process, or have any questions about it, leave a comment below, or send an email my way, to: min@equivalent-exchange.com.